
Tags
cork board frame, crafting, crafting on a budget, crafts, diy calendar, diy chalk board frame, diy cork board frame, DIY dry erase board, DIY Home Decor, diy jewelry organizer, dollar store, dollar store crafts, Family, hobby lobby, homemade, jewelry organizer, kid friendly, kid friendly crafts, Organization, picture frame crafts, pinterest, spray paint, thrifty Christmas gifts, upcycling
Next up in our series of Homemade Christmas gifts… Decorative Picture Frames!!!
Everyone has pictures around their home and offices!! So this is the perfect gift for anyone, men & women!! I know those men can be hard to craft for so I wanted to get this one out to y’all in the beginning!! Y’all can make this project as in-depth and detailed as you want to. Go with your personal skill level to make it easy and fun!!
Did you know you can transfer any picture onto wood with the help of Mod Podge?? Me neither!! A fabulous tutorial is here on My Kitchen Escapades. I LOVE the rustic feel to the finished project!! So simple and very thrifty at $1.25 each!!
With the burlap craze so heavily underway I just know someone on your list would appreciate an interchangeable photo frame covered in burlap!! Supplies needed?? Picture frame of your choosing, piece of cork/foam board big enough to put inside the frame, swatch of fabric or burlap to cover cork/foam board with, stapler and decorative push pins.

This project is so simple and can be done with big or small frames, burlap or fabric, bright or muted and still be so versatile!! Your loved one will be able to display different photos, changing them out at their whim with no fuss!!
Another super “in” look right now is the framed chalk boards!! I have sooo been wanting to make myself one of these…in due time!! I love the step by step tutorial here on Artsy Chicks Rule (love her blog name too!!). I’ve even seen spray paint chalk paint too, making this craft easier by the minute!! She is absolutely right about heading to the thrift store for this kind of project, so many ugly pictures in cool ass frames!!

Along the same lines as the framed chalk board is the DIY dry erase board. So simple and So Cute!! This one can be as plain or fancy as you want to make it!! I’ve seen a lot of these floating around on Pinterest for the kitchen. All you need is a frame with glass, a piece of scrapbook paper, sticker letters (optional) and a dry erase marker. DONE!! These are great for a Menu list for the week, a chore list for the kids/hubby (teehee), a grocery list, To Do list or even the kid’s after school activities. If you get a light weight frame, the dollar store is great for these, and some good strength magnets they’ll easily stay right on the fridge for everyone to see and not clutter up the counter tops or need a place on the wall. And with the world of scrapbook paper being what it is you can definitely find something that will work with anyone’s decor!! Simple, Thrifty and Customizable!! Win WIN for everyone!! You can find a step by step tutorial here at Make and Takes.

At Hobby Lobby (I just LOVE that place!!) they have very thrifty bare naked wood frames from very simple to very ornate to paint and decorate to your heart’s content!!

If you wanna get a little more in-depth you can easily make a jewelry organizers with a picture frame too. There are lots n lots of options out there, some use chicken wire mesh for a rustic country look, others use cork board with decorative push pins, others use foam board with wire strung across for earrings and still others use foam board wrapped in fabric with matching push pins to complete their master piece. I’m always of the notion to use what I have on hand or find that perfect frame to match the decor it’s going to be put with. I think the ornate frames pictured above would be perfect for this craft!! I found y’all a great tutorial to get your creative juices flowing here at I Love You More Than Carrots. Her display turned out beautifully!!

Another idea, this one would work better with a bigger frame, is a cork board message board. I love the tutorial here at Staying Close To Home. This is my kinda gal!! This would be ideal for those teenage girls in your life!! They always have TONS of pictures of friends n family to display!!

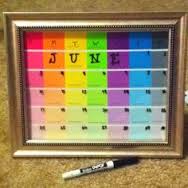
One of my all time favorite frame crafts is the calendar!! I have been wanting to make one of these for over a year now but just haven’t found the right frame to do it in that will work on the tiny bit of wall space I have… But that ain’t stopping y’all from making this oh so fun craft!! I love the idea of a smaller frame so you can use different scrap-book paper depending on the month or season but a bigger frame allows more writing space and works well with paint chip squares. Either way it’s a Win WIN for whoever y’all are making em for. At the big name craft stores there’s always an aisle devoted to stickers and I’ve found days of the week stickers several time, such an easy way to spiff up this simple project.
And last but certainly not least is the option to decorate a frame and put a great picture in it for your loved one!! Don’t forget to check out your local thrift stores for those cool frames with ugly prints. Be thrifty!! Shop smart not expensive!! There’s unlimited options for decorating a frame, it really is all about personal preference and matching the existing decor. Have the kids help and PUFF Grandma & Gramps have a treasured keepsake from the grandbabies. Try your hand at mosaics using broken up CD’s and DVD’s. Or you could add some glass pebbles or buttons or broken crayons or decorative tape or glitter or ribbons and bows or twigs or washers or pennies or flowers or scrap-book paper or rope/twine or stones – or any combination!! Maybe you want to spray paint it a different color, or distress it or stencil on it or draw on it or cover it with glitter or write on it… Where ever your creativeness takes you I just know it’ll be beyond fabulous!!
Happy creating my friends!! I’d love to see your projects!!
Which one would you wish for under the tree?? 😉
With Much Love
❤ Kristy
